Posts

Book Page Wreath

Image
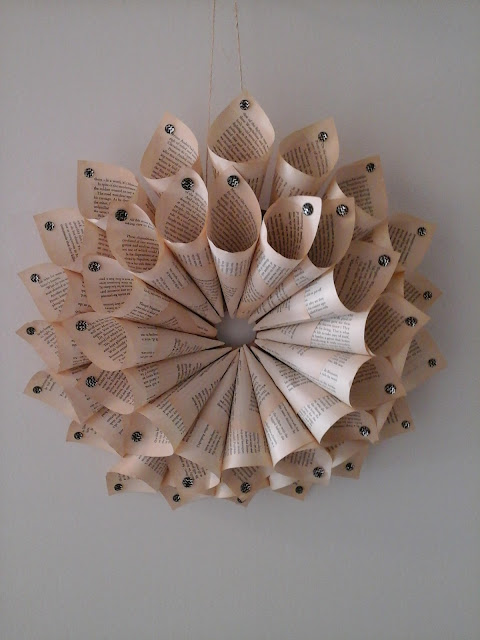
Once all the Christmas decorations are taken down and put away the walls look a little bare. I find it to be a good time to change up the decorations in the house.  The great thing about this wreath is that the wreath can be big and decorated or small and simpl, depending on when they are to be hung. I made this wreath with pages of an old book that had fallen apart (War and peace Vol. 2, I never read vol. 1.) I have been using the pages for different crafts for a few years.   What you need: Book pages ( for this wreath I used 36) Glue stick Glue gun Cardboard Stickers for decoration  What to do: Using a large bowl or plate, trace a circle on the cardboard. Measure the middle of the circle and cut out a circle about 3 inches in diameter. Make paper cones from the book pages, use the glue stick to secure the cone. To make a small wreath, place the cones close together, the ends covering the hole in the middle of the cardboard. Using the glue gun, glue ...

Learning to Sew: Ninja Turtle

Image
This is another simple sewing project for little hands. It is a great way to practice stitches and it makes a good keepsake or little decorative pillows on a bed. What you need: Green felt Red, purple, orange or blue felt Stuffing Piece of ribbon Sewing kit (needle thread scisors) Black marker White glue What you do: Fold the green felt in half, trace a circle using a cup and cut out the shape. Cut out a strip to be placed in the middle of the circle for a bandana. We used red to make Raphaël but it can be blue, purple or orange.  Glue the bandana on a green circle. Draw eyes on the bandana and draw a nose and mouth on the green felt. Once the glue is dry place the second circle behimd the first, you can either pin the two pieces together or hold them together for your little one. Make small stitches 3/4 of the way around the circle. Fill the circle with stuffing about 1/2 way.  Finish sewing. Make the ribbon into a loop and secure to the top orf t...

Pink or Blue? Chalkboard Gender Reveal Ideas

Image
This year is going to bring some big changes for us as our family of 3 becomes a family of 4! We are very excited and naturally I have started crafting and thinking of fun and creative ideas to announce our news, to countdown the weeks and right now, one of the big milestones, announcing the gender! There are some many great ideas for gender reveal. You can use cake! You can't go wrong with cake, by dying the cake itself either pink or blue and ising fondant icing to hide the surprise or the cupcakes where you pipe colored icing into the middle of the cupcakes. Balloons are another fun way to reveal the gender. This is an easy DIY reveal, fill a large box with pink or blue helium balloons and seal the box until the reveal. Or you can get a large dark colored balloon filled with pink or blue balloons or confetti that you can pop to reveal the gender. I was looking more for a way to reveal the gender through a picture that I could email to our family and friends. It was fu...

DIY Lego Valentine's Gift

Image
Your little Master Builders can make this heart shaped box for their Valentine. Or, you can surprise them and show them that you like playing with Lego as much as they do. It's the perfect little box to fill with chocolate or any other sweet treat. What you need: Red and white Lego  (multi colored would look nice too. Use what you have on hand, or under foot) Chocolate or candy  What to do: Start by making the shape of a heart using 2x2 and 2x6 flat bricks. Build up the heart shape using 1x1 and 1x6 bricks, build 3 layers of bricks Carefully turn the heart over, use 4x4 and 4x6 flat bricks to make the bottom of the box. To make the lid: Flip the box right side up Using 2x6 and 2x2 flat bricks recreate the shape of the box. Make 2 or 3 layers of bricks so that the lid is stable. Using 1x1 red bricks make the heart design in the middleof the lid. Fill with candy! Happy Valentine's Day!

New Year, New Look

Image
I'm not one for making hard and fast New Years resolutions. I have made some from time to time, this blog is one example. In 2013 I resolved to start a blog and stick to it, there have been other failed attempts. There have been sometimes when I haven't posted as much as I would have liked but that's life interrupting, all in all I like blogging and this is the only resolution that I've really stuck with. This year I'm going to make a vague resolution to change things up a bit. I'm going to give JustAddStickers a little bit of a face lift. A new look for a new year. And minimum 1 post per month. Thanks for reading, happy New Year and happy crafting!

Looking Back

Image
We had some good times this year making lots of fun crafts and good memoriess! Wishing you all a very happy New Year!

Candy Cane Cookies

Image
This is one of my favorite Christmas cookies from when I was a kid. They are a little long to make but so delicious and fun to malke when you have little hands to help you roll out the dough. Ingredients: 1 cup butter 1 cup sugar 1 egg 1 1/2 tsp almond extract 1 tsp vanilla extract 2 1/2 cups flour 1 tsp salt red food coloring The dough: 1. Preheat oven to 375°F  line a baking sheet with parchment paper 2. Beat together butter, egg, sugar and flavors sift together flour and salt 3. Add the dry to the wet ingredients mix until well blended 4. Seperate the dough into two equal portions 5. Add the red food coloring to one of portions of dough. Making the cookies: 1. Roll two long thin ropes one of the red dough and one of the plain dough 2. Line the two ropes up side by side, cut the ropes into equal sized sections.    3. Twist each section then shape into candy canes. 4. Bake for 9 minutes until set and sl...