Posts

DIY Mop Horse

Image
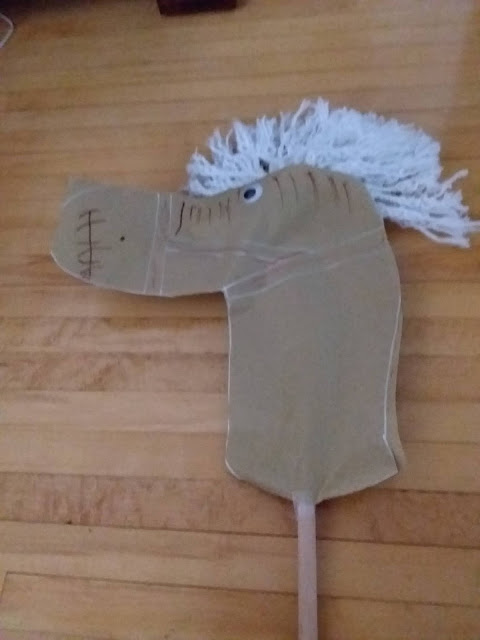
I am always looking for ways to reuse and repurpose toys and craft supplies we have to make new activities and ways to spend the afternoon. Little lady was asking for a toy horse, she is very interested in Toy Story and likes to dress up as Jessie. I didn't want to buy a toy horse for her to ride round the house for a few days (or hours) and then have another toy in the living room. We decided to make our own using the mop from her Melissa and Doug cleaning set and kraft paper. What you need: Child size mop or broom Kraft paper Tape and white glue Googly eyes Markers for decorating  What to do: Fold the Kraft paper in half. Trace the shape of the horse's head (without decorations or details I looks like a large boot) Cut out the horse's head. Place the mop between the two peices of Kraft paper, using the mop head as the horse's mane.  Glue and tape the two peices of Kraft paper together.  I think Little Miss liked this horse more than one we would have bought because sh...
Have a Crafty New Year!

Image
Wishing you a happy and healthy new year!

New Year's Eve Fun

Image
  I was having some fun making decorations for New Year's Eve. I love  decorating and even though it's just out little family tonight I enjoyed making new decorations for the occasion. This time I drew on the hands of the clock to read midnight but other years I have made a clock with movable hands to countdown the hours to midnight (or they can countdown to bedtime!) To make the clock I used simple white paper, it would be nice with construction paper or card stock. I used stamps but stickers would work well or writing the numbers if you have a steady hand. To make the clock fold the paper lightly in 4 to find the center of the circle and to line up the numbers evenly.  Once your clock is finished you can draw with hands pointing at midnight or cut out two straps of construction paper one long and one short and attach them in the middle of the clock using a paper fastener.    Happy crafting and Happy New Year!

Christmas Gnomes

Image
Easy DIY Christmas Gnomes These cute little guys are fun and easy for little crafters and make a cute addition to any Christmas decor.  What you need: (per gnome) Peice of felt Square cotton makeup remover Egg carton (one compartment cut from the egg carton) 1 bead for his nose and other beads for decorating his hat Hot glue What to do: For the hat: Cut a strip of felt, fold both ends toward each other to make a cone shape, in the size that you want (it should be big enough to cover the top portion of the egg carton.) The bottom will be uneven, cut the uneven peices to make a curve.  Put hot glue on one end if the felt, fold the other side over and press together. Cut the cotton square to fit onto the egg carton, hot glue it in place. Hot glue the hat in place, making sure to tip it back slightly.  Hot glue a bead tucked just under the hat as a little nose.  Decorate the hat with beads, glitter or paint pens (little crafters can do this step before glueing the hat to...

Family Advent Calendar

Image
Family Advent Calendar This is a fun family sized advent calendar. Most years I make our advent calendar, in the past I have used a cardboard box separated into compartments, plastic trading card sleeves and my favorite, the 24 count mini muffin tin . For our family advent calendar this year used my muffin tin and went with different flavors of Hershey's Kisses since they have lots of kinds available for Christmas including sugar cookie!  Since the kids are getting a bit older I've added a level of difficulty this year by adding a search and find o find the door of the day. On a peice of wrapping paper I stuck the same set of stickers but with numbers on the picture. They have to find the number and the picture on the paper and then find the same picture on the advent calendar. What you need: 24 count mini muffin tin  24 round gift tags Christmas stickers (2 identical sheets of 24 stickers) Hershey's Kisses (I chose4 different kinds to change it up from day to day) 1 large ...

DIY Haunted Houses

Image
Haunted Houses What you need: Popsicle sticks Paint Waterproof all surface top coat Glue gun What you do: Decide how big you want to make your haunted house, you can cut the popsicle sticks or, I prefer to break them so that you have a jagged edge which adds to the dilapidatedness of the haunted house.       2.Once you have figured out what your house will look like, you can paint it. It is easier to paint the           popsicle sticks before you glue them together.      3. glue the popsicle sticks together. Add the details to our house, windows etc.      4. Once the paint and glue have dried paint the whole house with a waterproof top coat.      5.Once the top coat is dry you can place them in your haunted fairy garden.  

Twinsies

Image
Twinsies! Little miss likes to match with her dolls. When I was going through her clothes I found a pair of leggings that were too short. They were a nice pattern and still had lots of wear left in them.  I decided to cut the leggings to make bike shorts. Usually, once Little Miss has outgrown her leggings the knees are worn and have holes. Since this pair was still in good shape I decided to make a matching outfit for her doll with the rest of the material. Using the material from the leggings I had enough material to make a doll dress, doll headband and hair bow for little Miss. What you need: •An old pair of leggings •Decorative buttons •Hair elastics •Needle and thread What to do: 1. Measure the leggings against a pair of shorts that are the length that you want. Measure and cut the leggings. Depending on the material you might need to hem the shorts so they don't fray.  2. Use one of the cut off legs to make the doll dress. Lay the material flat, in the center of the mate...