Posts

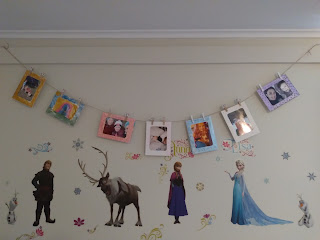
All our Eggs in One Basket

Image
This craft is an Easter version of the Valentine surprise I made for the kids this year. We made this craft as a surprise for my Mom, when she came to our house for Easter this year and we wanted to decorate her door. What you need: ●Paper white and papperned paper (you could also use white paper and decorate it like Easter eggs) ●Colored markers ●Scissors, glue and tape What to do: 1. On a piece of the white paper, draw the shape of a basket. Cut out the basket shape.  2. Draw different sizes of eggs on the patterned paper and cut out the eggs.  3. On each egg, write a positive adjective or an Easter pun. 4. Decorate the basket. Choose a few eggs to glue in the basket.  5. Take the rest of the eggs to the door. This is a good surprise for Easter morning! Happy crafting and Happy Easter! 

Chalkboard mailbox Craft

Image
I found d this cute Letters to Santa DIY mailbox for 80% off at Michael's after last Christmas. I wasn't a big fan of the picture on it and I thought I could make it an all occasion mailbox. My plan was to paint it with Chalkboard paint and decorate it for any occasion, Valentine's Day or Birthdays or Letters to Santa.  What you need:  • Wood mailbox (from a craft store or Dollarstore) • Chalkboard paint, red paint and songe paint brush What to do: 1. Paint the mailbox with 2 or 3 coats of Chalkboard paint.  2. Paint the flagwith red paint, 1 or 2 coats. 3. After 24 hours, rub the mailbox with a peice of chalk to season the Chalkboard paint 4. Decorate! Use for Valentine's cards, birthday cards and letters to Santa! Happy Crafting!

Messages from the Heart Fairy!

Image
This is our family's variation of an activity I saw on Instagram. I started out by decorating the kid's doors with hearts and adding one heart every night before I went to bed so they had a nice surprise in the morning. Little Miss said it must be messages from the heart fairy, who is like the toothfairy but for Valentine's Day. I love that she imagined up a Valentine's Day fairy who leaves heart shapped messages on kid's doors on the days leading up to February 14th. I imagine a fairy dressed in red and pink with heart shapped wings. What you need: ●Construction paper or card stock (the paper can be Valentine's colors or your kid's favorite colors. I used what I had on hand, red, blue, orange and yellow)  ●Markers ●Tape What to do: 1. Cut out one large heart (for the center of the door.) Cut out 14 medium sized hearts (big enough to write a sentence in.) Cut out 10-15 small hearts.  2. Cut out a banner to go accross the b...

National Sticker Day

Image
January 13th is national sticker day! I don't know who decided that stickers needed their own special day but here at Just Add Stickers we will take any occasion to celebrate stickers! Funny thing, I was not big into stickers when I was a kid but I am all about stickers now. Now I have sticker books for planning and decorating for all occasions! The inspiration for the name of my blog came from my Little Man, all I had to do to occupy him was give him some stickers and a peice of paper. Any craft was fun as long as he could just add stickers!  

Reading Journal 2024

Image
I started my 1st  reading journal  last year. I was not sure if I would keep up with it but it was fun to make and decorate. It turns out that I did use it a lot. This past year I read 20 books and listened to 26 audiobooks (I also posted 25 blog posts, which I keep track of I the same place that I keep track of my books in my Happy Planner.)  I am going to continue using a reading journal this year, with a few adjustments. There were some pages that I didn't use like my wish lists and my to be read list, I tend to use my Planner or Goodreads for that. I also had a 2 page spread to keep track of the books that I read and the audiobooks I listened to.  For this year I made my audiobook and book trackers side by side. I also decided to write my book and audiobook reviews and notes in the same place. Last year I had two separate sections but I didn't use the audiobook section very much, even though I listened t...

DIY Picture Frame Art

Image
Best laid plans, I meant to post DIY projects every week in December but life got in the way and it was a busy but fun month. I had DIY present ideas to share but I will keep them for another time. This is a craft that is perfect for displaying your memories from the past year. In 2013 I shared this  New Year’s  photo craft, as a way to display our favorite pictures of the year. This year I found this picture frame garland that we decorated and filled with some of our best pictures of the year.  What you need: ● 1 paper picture frame garland package ( I got this one at the Dollar Store but I have also seen them at Michael's) ● Watercolor paints and/or markers ● Pictures from rhe year ● Optional - festive clothes pins (the picture frame garland package came with plain clothes pins but we chose these rainbow and unicorn ones, you could also decorate the plain ones)  Instructions: 1. Paint your picture frames. You can paint them according to seasons or to match your pic...

DIY Magic Mixie Cauldron Refill

Image
This year instead of doing Blogmas as I have for the past 2 years, I am going to try something a little different that I am going to  call DIY December. I am going to share some DIY ideas that you can make for the kids or that you can help the kids make for others.  The 1st idea that I want to share is the refill for the magic mixies Cauldron. There are a lot of ideas out there these are the ones and the order that I found work best. There are 7 steps before the spell is complete and the surprise appears.  The 1st things you need is 6 containers, the cauldron comes with a flask for water for the first step. For the rest of the steps you can use whatever you have on hand. I think that an eclectic collection of jars and containers make it feel like special ingredients for a magical spell. Spritz bottles from the Dollar Store are a good addition and spare mini cauldrons from magic mixies are great for dry ingredients.  This is my list of ingredients: Step 1. Water Step ...