Posts

Frozen Activities

Image
This week's theme day was...surprise, surprise...Frozen. During this quarantine we have watched Frozen, Frozen II and Olaf's Frozen Adventure more times than I care to count. So far, all of our themes have been geared towards Little Man so this one was all about Little Miss but it was fun for everyone. Oops Elsa froze her friends. Anna, Olaf, Christof, Sven, and the water Nook were trapped in an ice block. It's up to you to same them! We did a version of this activity years ago with super heroes . It fits in perfect with the Frozen theme and It's a great activity on a hot day.  Freeze plastic characters in a large plastic container full of water the night before. Using plastic tools let the kids chip away at the ice block.  An Elsa, Anna and Olaf craft. Create your very own Anna, Elsa and Olaf with toilet paper rolls. Cover the rolls with blue, pink and white construction paper. Cut out accessories for each character, ...

Pirate Treasure Hunt

Image
This was the craft idea that got me back on the blog. During quarantine, Fridays are theme days at our house. We take a break from school work and do something fun. I had the idea of doing a pirate scavenger hunt. I remembered doing one for little man when he was younger but couldn't remember what we had done. I looked up my  pirate post from a few years ago. It gave me inspiration to create a fun treasure hunt for the kids. I made treasure boxes filled with pirate crafts. Material: Kleenex box Brown paper (craft paper or construction paper) White paper  Paper towel rolls for swords and spy glass  Felt (2 large pieces for the big hat and 2 small pieces for one doll hat) Pirate stickers for decorating Markers for decorating the pirate hats (fabric markers or paint markers) Glue gun Directions: Treasure map: Tear the edges of the white paper one piece for the treasure map and one piece for a craft Draw the treasure map on one page and leave the other bla...

The More Things Change, the More They Stay the Same

Image
Hello again!  It's  been a little while! Some things have changed a little since my last post in 2017 (but we do still have the heart shaped Lego box from my last post.) My little man isn't so little anymore and we are now a family of four.  We still craft, create, cook, garden and have adventures. I got out of the habit of blogging after little man started school and we didn't  craft as much. Recently we were reading through the blog looking for a craft ideas and looking back made me want to blog again. My little miss is now the same age as my son was when I started blogging.  She likes to create and help in the kitchen. During this period of quarantine we have had lots of time to get back to creating, cooking, gardening and finding fun activities. On Fridays we've  been taking a day off of homeschooling and having theme days, sometimes they're  educational and sometimes theyre just fun.  I hope you'll  join us for our ne...

Book Page Wreath

Image
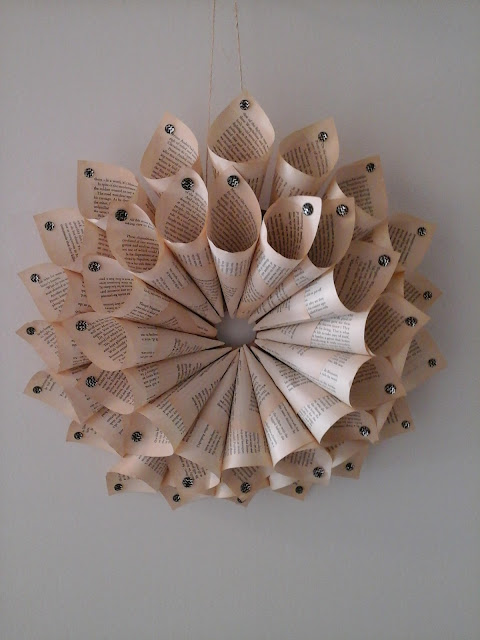
Once all the Christmas decorations are taken down and put away the walls look a little bare. I find it to be a good time to change up the decorations in the house.  The great thing about this wreath is that the wreath can be big and decorated or small and simpl, depending on when they are to be hung. I made this wreath with pages of an old book that had fallen apart (War and peace Vol. 2, I never read vol. 1.) I have been using the pages for different crafts for a few years.   What you need: Book pages ( for this wreath I used 36) Glue stick Glue gun Cardboard Stickers for decoration  What to do: Using a large bowl or plate, trace a circle on the cardboard. Measure the middle of the circle and cut out a circle about 3 inches in diameter. Make paper cones from the book pages, use the glue stick to secure the cone. To make a small wreath, place the cones close together, the ends covering the hole in the middle of the cardboard. Using the glue gun, glue ...

Learning to Sew: Ninja Turtle

Image
This is another simple sewing project for little hands. It is a great way to practice stitches and it makes a good keepsake or little decorative pillows on a bed. What you need: Green felt Red, purple, orange or blue felt Stuffing Piece of ribbon Sewing kit (needle thread scisors) Black marker White glue What you do: Fold the green felt in half, trace a circle using a cup and cut out the shape. Cut out a strip to be placed in the middle of the circle for a bandana. We used red to make Raphaël but it can be blue, purple or orange.  Glue the bandana on a green circle. Draw eyes on the bandana and draw a nose and mouth on the green felt. Once the glue is dry place the second circle behimd the first, you can either pin the two pieces together or hold them together for your little one. Make small stitches 3/4 of the way around the circle. Fill the circle with stuffing about 1/2 way.  Finish sewing. Make the ribbon into a loop and secure to the top orf t...

Pink or Blue? Chalkboard Gender Reveal Ideas

Image
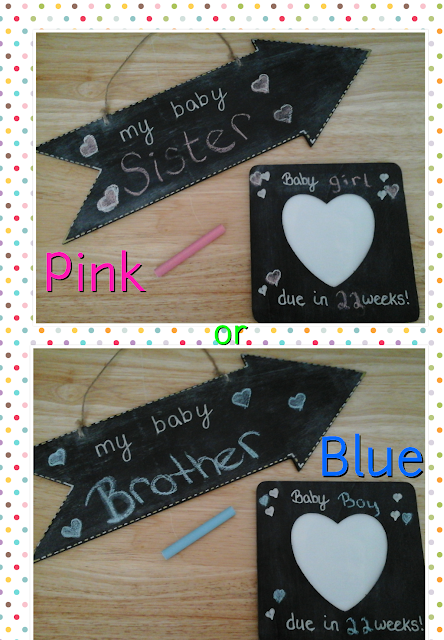
This year is going to bring some big changes for us as our family of 3 becomes a family of 4! We are very excited and naturally I have started crafting and thinking of fun and creative ideas to announce our news, to countdown the weeks and right now, one of the big milestones, announcing the gender! There are some many great ideas for gender reveal. You can use cake! You can't go wrong with cake, by dying the cake itself either pink or blue and ising fondant icing to hide the surprise or the cupcakes where you pipe colored icing into the middle of the cupcakes. Balloons are another fun way to reveal the gender. This is an easy DIY reveal, fill a large box with pink or blue helium balloons and seal the box until the reveal. Or you can get a large dark colored balloon filled with pink or blue balloons or confetti that you can pop to reveal the gender. I was looking more for a way to reveal the gender through a picture that I could email to our family and friends. It was fu...

DIY Lego Valentine's Gift

Image
Your little Master Builders can make this heart shaped box for their Valentine. Or, you can surprise them and show them that you like playing with Lego as much as they do. It's the perfect little box to fill with chocolate or any other sweet treat. What you need: Red and white Lego  (multi colored would look nice too. Use what you have on hand, or under foot) Chocolate or candy  What to do: Start by making the shape of a heart using 2x2 and 2x6 flat bricks. Build up the heart shape using 1x1 and 1x6 bricks, build 3 layers of bricks Carefully turn the heart over, use 4x4 and 4x6 flat bricks to make the bottom of the box. To make the lid: Flip the box right side up Using 2x6 and 2x2 flat bricks recreate the shape of the box. Make 2 or 3 layers of bricks so that the lid is stable. Using 1x1 red bricks make the heart design in the middleof the lid. Fill with candy! Happy Valentine's Day!