Posts

Showing posts from 2014

Last Post of theYear!

Image
2015 is almost here and with this post I have reached my blogging goal for this year! Last January I made a resolution  to post at least 6 times a month and here it is post number 6 of December and with a few hours to spare! My blog resolution for this year is to keep writing 6 posts a month and have one yoga related post every month. Here's to celebrating our little achievements in 2015 Cheers!

New Years Eve Crafts

Image
For a New Years craft last year we made a poster   of our year in seasons using family pictures taken throughout the year. This year we made accessories to get all decked out for the New Year! Material: Construction paper Markers Stickers and sparkles  White glue Jingle bell garland  Pipe cleaners Directions: Pipe cleaner glasses: Choose 6 pipe cleaners, for each pair of glasses you want to make. Shape the numbers of the up coming year and place them side by side. Cut a piece of pipe cleaner into 4. Using the small pieces of pipe cleaner attach all the numbers together. Cut the last pipe cleaner in 2 and attach one piece to either side of the year. Curve the pipe cleaner so that the pipe cleaner glasses will sit on your ears. Party hats: Choose the colour of construction paper for your hats, fold the paper in a cone shape, trim the bottom to make it the size you want. Lay the paper flat and decorate with markers and stickers. Use the whi

Santa eats Spaghetti!

Image
Spaghetti and meatballs and a carrot (shaped like Olaf's nose) for the reindeer While we were talking about Christmas eve my mom said to the little man. "We can't forget to put out cookies and milk for Santa" "Why?" Common question from a 4 year old. "Because Santa gets hungry from delivering all those toys." "Then we should leave Santa spaghetti! Cookies are for dessert. If Santa is hungry he should eat spaghetti." I have to say he has a point, we try to teach him how to eat healthy then tell him Santa can have cookies for supper? So it's settled Santa eats spaghetti at our house! Merry Christmas!

Mason Jar Snow Globes

Image
No water. No mess. Easy to make snow globes. Personalise these snow globes by using different figurines. They are great homemade presents to give. Time: 30 minutes for 3 snow globes Cost: $6.00 for 3 snow globes Material: Empty jars Figurines (1 or 2 per jar depending on the size) Large sparkles  Cotton ball snow Jingle bell garland Glue gun Direction: Glue the figurine to the lid of the jar. To add a little extra ambiance you can use a small house or figurine that lights up. If you use a figuring with a switch on the bottom use an exacto knife to carefully cut a hole in the lid. Cover the hole with tape before you glue the figurine onto the lid. If you don't have a figurine you can make a snowman out of golf balls or white pom poms.  Glue some of the cotton ball snow around the figurine.  Put 1-2 tablespoons (depending on the size of the jar) of sparkles in each jar. Screw the lids back onto the jars. Shake the jar to make sure there are enough spark

TBT Grandma's Christmas

Image
This was my Grandmother's Christmas tree the year my sister was born. My mom calls it the year of the 7 little girls under 7. Under the tree, all made by Grandma were 5 Care Bears, 4 babies in baskets (babies made out of a stalking and stuffing in a basket) and 1 Padington Bear, for my cousins and I. I can't imagine all the work that went into thse presents.  I was only 4 but I remember that Christmas and I still have my Care Bear!

Christmas Picture Frame Art

Image
This is easy and fun and as long as you use non permanent markers you can wipe it away after Christmas put the pictures back in the frames and you're back to normal. There are so many possibilities as far as designs, angels, snowmen, Christmas trees or your own made up designs. Cost: Under $5.00 Time: 20 minutes Material: Picture frames Dry-erase markers (or any non permanent markers) Aluminum foil Directions: Take the backs off of the picture frames and take out the pictures. Draw Christmas pictures on the glass, trees, snowmen etc. The best part is that you can try and erase as many times as you like. Wrap the back of the frames with aluminum foil. Press the foil flat. Reassemble the picture frames (make sure the marker side goes against the foil, but don't move it too much or it will scratch your picture) and display!

Minion Birthday Card

Image
Here is some more minion fun. This is a card we made for my nephew's birthday that can be taken apart and used as a door hanger. We made the minion and name using perler beads and decorated the card with minion stickers. Material: Perler beads (multicoloured as well as separated colours yellow, black and white) and square frame Pipe cleaner Stickers Construction paper Markers Directions: Door hanger: Make a minion shape with the perler beads. When you're done place waxed paper over the minion and iron until the beads are melted. Remove the minion from the frame and set aside to cool. Write the name using the perler beads. Place waxed paper over the beads and melt with the iron. Remove the name and set aside to cool. Bend the pipe cleaner into a circle and twist the ends.  Using the glue gun, glue the pipe cleaner to the back of the minion. Glue the name under the minion. Card: Using the glue gun, glue the minion door hanger to the front of the

DIY Muffin Tin Advent Calendar

Image
I love the idea of customising advent calendars to your family's interests. Last year I made a   DIY Lego Advent Calendar  and it was a big hit. This year I'm going with a favourite, stickers and using the versatile muffin tin for the calendar. The great thing about the muffin tin advent calendars is that almost anything will fit in there. You can fill the muffin cups with your family's favourite candy, Lego or beads, anything goes. Time : 30 minutes Cost: $6.00 gift tags and stickers (not including muffin tin) Material: Mini muffin tin for 24 muffins 28 Round gift tags (same size as the muffin cups) Surprises (stickers, candy etc.) Markers (red and green) Tape Glue gun Directions: Divide your surprises into 24 piles. Use the markers to number the gift tags 1 - 24. On the remaining gift tags write the year (one number per gift tag.) Place the surprises in the muffin cups. If you want the muffin tin to be upright tape the surprises to the bottom

Minion Fun!

Image
My little man has never seen Despicable Me 1 or 2 but he loves the minions and with good reason who doesn't love minions? I got this idea from a teacher friend who had her class decorate minions with characteristics specific to each student. We printed out some minion colouring pages, decided what kind of minions we would make and then drew specific characteristics for each minion. It's a fun craft and helps develop vocabulary while having fun! Cost: Under $5.00 Time:  20 minutes Material: Black and white printouts of minions Markers, crayons or paints Popsicle sticks White glue Directions: Print out a stack of minion pictures (I printed out 3, full page minions and 6, half page minions)write what kind of minion it will be on the bottom of each paper. We did a combination of emotions (happy, sad) and characters (pirate, princess etc) For each minion talk about what characteristics would make that minion a happy minion or a princess minion etc. and

Mama's Birthday Tradition

Image
This year: tree ornament and Christmas plate For my birthday the last 2 years I've painted ceramics with my little man (and my mom this year.) It's a great way to make memories and have keepsakes from year to year. Since my birthday is at the start of the Christmas season we paint tree ornaments or decorations. Last year little man painted for 5 minutes then was off to play with the toys. This year he was excited to paint and lasted over 10 minutes and even made a pattern before heading off to play with the toys. It's a lot of fun to see the changes in his attention span and creativity. During the year I thought about going to paint ceramics again but never made time for it (and you get 15% off on your birthday!) I like having an activity set aside to do once a year, it makes it special. Last year: tree ornaments

Crafting Fails!

Image
Sometimes crafts don't turn out so well but they are salvageable and sometimes there's nothing to be done. I thought that I'd share some of my recent blunders. So these were supposed to be chocolate dipped apples shaped as footballs, not so much but no matter it was still chocolate! So this is supposed to be Olaf can you tell? But again, marshmallows and chocolate chips are tasty even if they don't look like Olaf. The great thing is that kids don't know blunders from Pintrest pictures, having fun and spending time together is really all that matters to them. Happy crafting and happy failing!

Gotta Love a New Craft Book!

Image
  My mom brought me back the book 50 Rainy Day Activities by Usborne  from her recent trip to England. There are a lot of fun crafts mostly involving paper and paint and other common craft material. Except for one craft that is making animals out of marzipan, I'm not sure about that one!  There are crafts specifically for boys and for girls and other crafts that appeal to both like these royal bookmarks.  There are crafts for specific seasons like this haunted castle with ghost stamps.  There are even ideas for 'magic' tricks like this putting the prisoner back in jail trick. There are some great ideas in this book I definitely recommend it, it's a great book for both crafters and those who are not so crafty!

Fast Spooky Food!

Image
These are some spooky food ideas that are fast and easy enough to make before going out trick or treating! English Mummy Pizzas Ingredients: English Muffins Pizza sauce Mozzarella cheese cup into strips Cherry tomatoes Your favourite toppings: Pepperoni Chopped Peppers Directions: Toast english muffins (to keep them from getting soggy) place on a baking sheet. Spread pizza sauce over the english muffins top with your favourite toppings. Arrange the strips of cheese over the toppings,  leaving a space for tomato eyes. Broil for 1-2 minutes. Grilled Pumpkin Cheese Directions: Prepare your favourite kind of grilled cheese. Cut grilled cheese into the shape of a pumpkin, cutting out the eyes, nose and mouth. Ghosts in the Shepherd's pie Directions: Prepare your favourite shepherd's pie recipe as normal keeping one cup of mashed potatoes and a few pees aside. Cook shepherd's pie as usual. Place the extra potatoes in a Ziploc bag, cut

Halloween Photo Booth

Image
Photo booths are always a favourite at parties.  I made this photo booth for my son's Halloween themed birthday party. Since everyone was going to be dressed up in their costumes I chose to have mostly words and Halloween shapes as photo booth props. Cost: About $5.00 (for the straws and table cloth and glasses, all can be found at the Dollar Store) Material: To make props: Black, white and orange construction paper Paper straws Black marker Scissors Tape Glue Other material: Large picture frame Halloween table cloth Directions: Props: Fold paper in half. Use the marker to draw Halloween words such as: Boo, Ahhhh and Happy Halloween. Draw shapes such as: Pumpkins, bats, ghosts and spiders. Cut out the words and shapes. Unfold the paper, glue one side of the paper, place straw in the centre and refold. Set aside to dry. Set up: Hang the table cloth on the wall. Set up props on a table not too far from the table cloth back drop. Take a pro

Rainy Day Treasure Hunt

Image
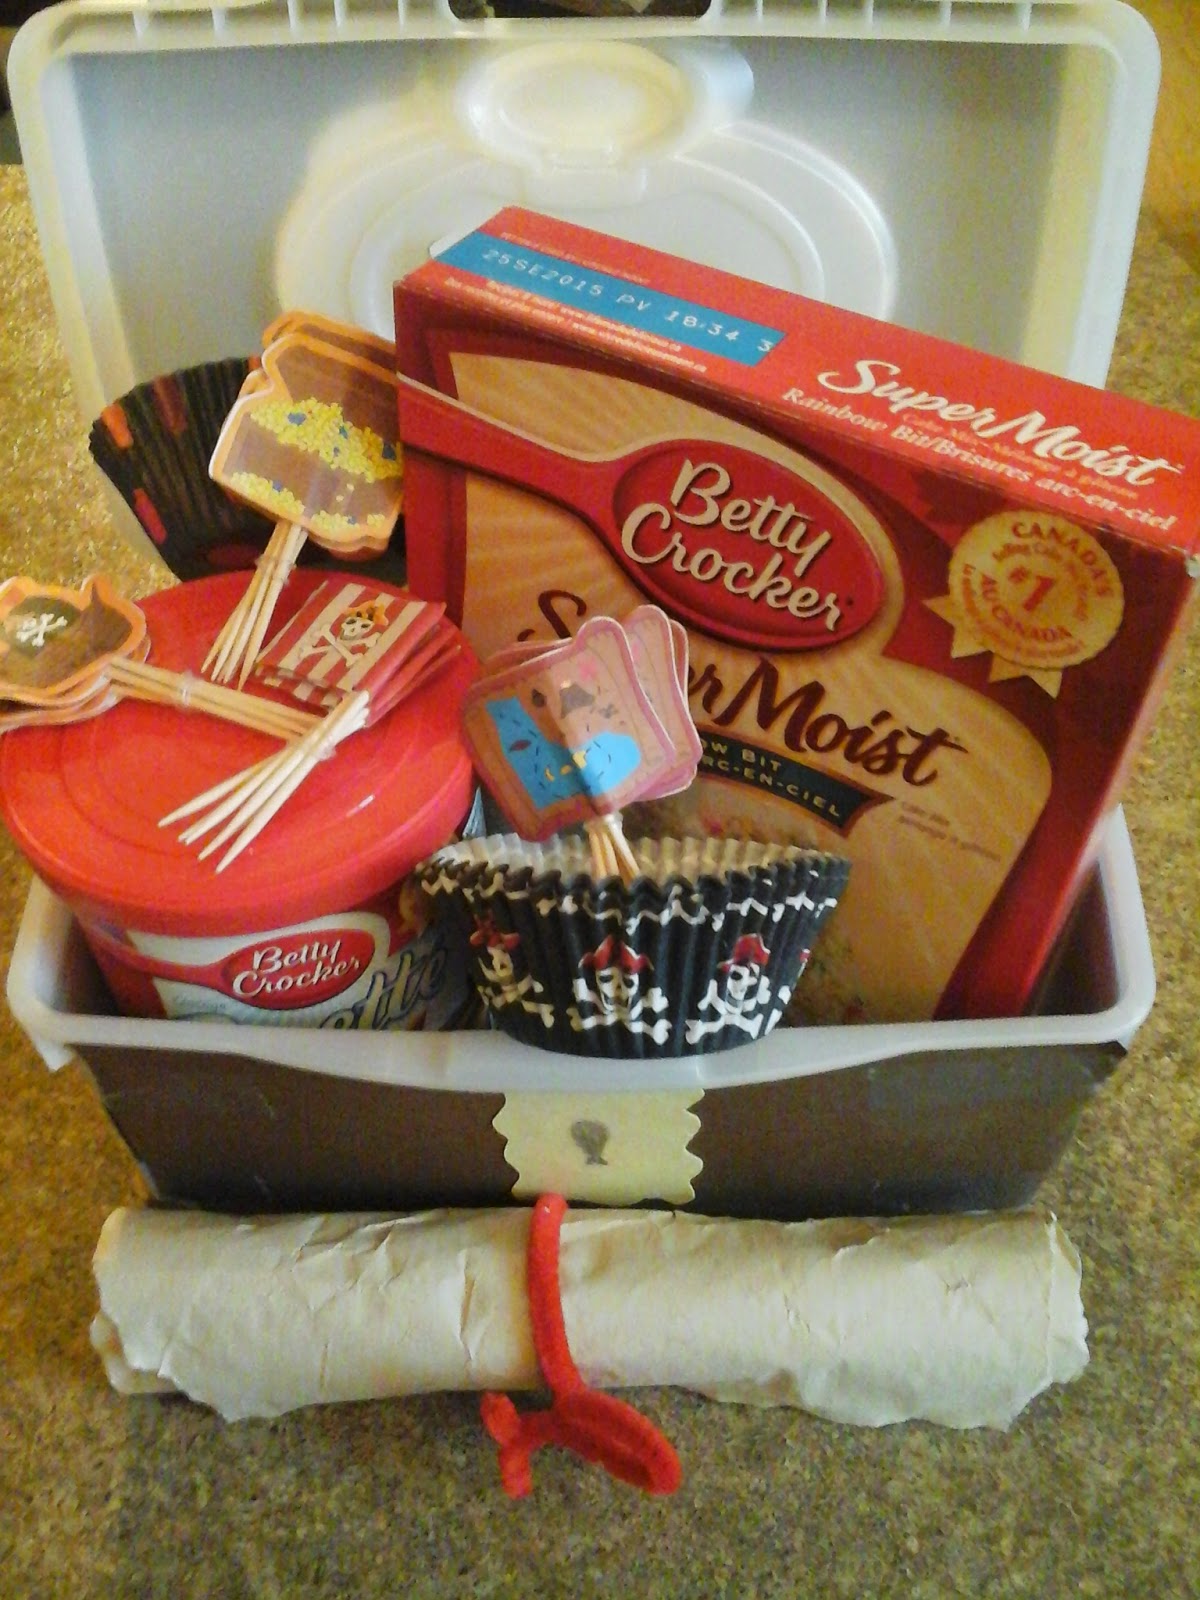
Who doesn't like a good treasure hunt? This is a great activity for a cold, rainy fall day. Do the treasure hunt, make the cupcakes and have a treat! Material: Paper and pen Tea for dying Cake mix, icing and decorations for the loot Treasure box Directions: Place your loot in the treasure box like this one  we made to play pirates, and hide the treasure in the house. Using the paper, pen and tea make a treasure map  like this one  I made for our fall foliage treasure hunt. This is the fun part: surprise your little pirates with the treasure map, follow the map, find the surprise and bake!

First Family Run

Image
I signed us up for a run to benefit our city's woman's shelter on Thanksgiving Sunday. I'm not a runner, at all so I signed up for 2k run and I signed the little man up for the children's 500m. Signing up was the easy part then there was the training. I had one month. 2km isn't far to run but it had been a long time since I had run at all. On my first try it took me 17 minutes and I ran less than half. By the third time out I found my rhythm (slow) but I ran the whole way. It was fun to have something to work at and slowly I could see and feel my improvement. We practiced one a week as a family in the park where the run would take place. My hubby is an avid runner so he was our coach, showing us the best warm ups and giving tips on how to find a rhythm. Our little man was very excited to run all together, he ran the whole way without stopping. The day of the run was a perfect fall day, sunny and 13ºC. I ran my best time yet at 14 minutes. Little man did grea

Apple season

Image
We went apple picking last weekend and much to my surprise it was probably the last weekend the orchard would be open! It was such a beautiful weekend I imagine by Sunday afternoon there weren't many apples left. Because there was only McIntosh apples trees left we got a 10 pound bag for $8.00. Now besides eating them right out of the bag, what to do with these apples. First off there's applesauce! 12 apples 4 cups of water Cinnamon Nutmeg Peel and cut the apples. Place all ingredients in a medium saucepan with a lid. Cover and boil over medium-low heat for about 25 minutes. And while you're making applesauce you might as well make.... Applesauce Oatmeal! 2 1/2 cups water 1 cup instant oatmeal Dash of salt 1/2 cup applesauce 1/4 cup walnuts Maple syrup  Cook the instant oatmeal as indicated on package. Add the applesauce, walnuts and maple syrup for the last 5 minutes. And then there is Applesauce muffins! This is a delicious recipe from 100 Day

Eggciting Superheroes!

Image
This is a fun craft for little ones who love all things superhero. Use the finished product as puppets, if you add Popsicle sticks or as masks for little toys, we played trick or treat! 5yMaterial: Egg cartons Paint and brushes Scissors Directions: Start by covering your work space with towels or paper towel, set out the paint, brushes and water. Remove the lid of the egg carton. Cut the egg carton length wise, so that each person has 6 egg cups to paint. Paint superhero faces on each egg cup. I looked up superheroes on Google Image to have a better idea of what each one looked like.  Set aside to dry. When the paint has dried cut each egg cup away from the rest. If you are making puppets, glue a Popsicle stick to the back of each egg cup. All ready for Halloween, Rescue Bots (Blades and Optimus Prime) dressed up as The Hulk and Captain America.