Posts

Showing posts with the label kids crafts

Frozen Activities

Image
This week's theme day was...surprise, surprise...Frozen. During this quarantine we have watched Frozen, Frozen II and Olaf's Frozen Adventure more times than I care to count. So far, all of our themes have been geared towards Little Man so this one was all about Little Miss but it was fun for everyone. Oops Elsa froze her friends. Anna, Olaf, Christof, Sven, and the water Nook were trapped in an ice block. It's up to you to same them! We did a version of this activity years ago with super heroes . It fits in perfect with the Frozen theme and It's a great activity on a hot day.  Freeze plastic characters in a large plastic container full of water the night before. Using plastic tools let the kids chip away at the ice block.  An Elsa, Anna and Olaf craft. Create your very own Anna, Elsa and Olaf with toilet paper rolls. Cover the rolls with blue, pink and white construction paper. Cut out accessories for each character, ...

Outdoor Painting

Image
These monogram signs are the perfect outdoor painting project for little and big artists. Take a walk outside before painting to collect flowers, pinecones, sticks and rocks that would make interresting stamps for your artwork. Material: Canvas, wood canvas or wood sign (I used a wood canvas and a wood sign I found at the Dollar Store) Acrylic paint  Sponge brushes (or sponges) Masking tape Pine cones, flowers, sticks, grass etc. Marker (I used a silver sharpee) Step 1: Paint the canvas with a neutral back color and let dry Write a letter in masking tape (the first letter of your family name or your children's name) tape a border around the canvas. Step 2: Using sponge brushes or sponges paint the canvas. Sponge paint around the masking tape letter. Step 3: Using the pine cone, flower, stick and other nature made paintbrushes to stamp and make patterns on the canvas. Step 4: Let the canvases dry in the sun. Step 5:...

3 Step Lightsaber Craft

Image
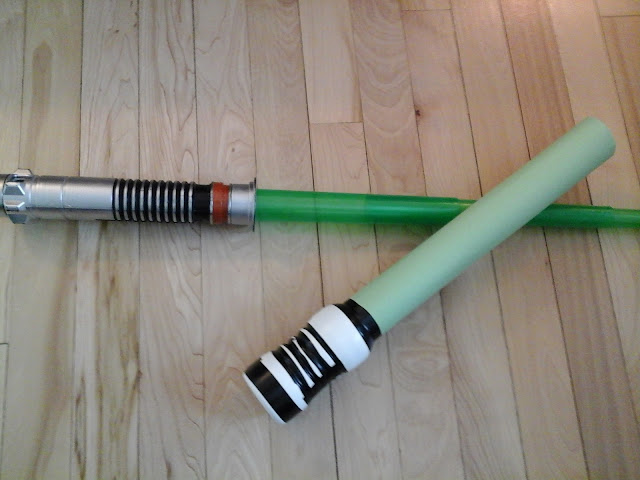
This is a fun and simple craft that is sure to please any little Star Wars fan. You can make green and red light sabers to recreate your favorite movie scenes. Material: Empty paper towel roll Empty milk bottle (the kind from McDonald's works well) or you can use an empty Yop bottle. Remove the label Green or red construction paper (depending on your character preference) Black electrical tape Glue stick Scissors Step 1: Wrap the green or red construction paper around the paper towel roll. Glue the construction paper as you roll.   Step 2: Attach the paper towel roll to the bottle. Secure it in place with the black electrical tape.  Step 3: Decorate the bottle with the black electrical tape.   Cut two strips of tape lengthwise and to make the thin stripes and use full strips of tape on the top and bottom. Have fun!

DIY Spring Craft

Image
Get crafty with this DIY White Picket Fence chalkboard magnet. This is a great decoration or a homemade Easter present. What you need: Popsicle sticks Chalkboard paint White paint Green felt Chalk String Glue gun What you do: Lay 11 popscicle sticks side by side. Glue them together using the glue gun. Glue the remaining 2 popsicle sticks across the top and the bottom. Paint the mid section with the chalkboard paint.  Paint the top and bottom of the fence white. Let dry and give everything a second coat. Cut a piece of green felt the length of the fence. Cut jagged edges along the top of the felt to look like blades of grass. Glue the felt along the bottom of the fence. turn the fence over, glue 4 magnets to the back. While the glue is drying, glue one end of the string around the piece of chalk. Glue the other end of the string to the back of the fence. Place on the fridge. Happy crafting!

Handy Apron

Image
This is a fun project to make with your little helpers. Let them get all messy while painting these aprons that will keep them clean when they help you in the kitchen. Make sure to cover your work space or paint the aprons outside. Time : 30 minutes Cost : $12.00 Materials : ·          Aprons (you can find blank aprons at the Dollarstore) ·          Fabric paint or markers Directions : 1.        Wash and dry the aprons before starting the craft. 2.        Lay the aprons a table (make sure all surfaces are covered this can be very messy!) 3.        Decorate the aprons.   I wrote the words first: Alex’s Apron Hands Off.   Then I let him decorate. 4.        Trace your child’s hand if you are using fabric markers or make a hand print if you are using...