Posts

Showing posts from 2013

New Year's Eve Craft

Image
Conversation with a three year old about New Year's Eve: Me: Should we decorate for New Year's Eve? Little man: More presents? Me: No, there's no presents. Little man: Cake? Me: No, we're not having cake. Little man lost interest at this point. Obvliously I needed to work on my approach to the subject. What better way than with a craft! To put the year into perspective for the little man I glued together 4 pieces of construction paper representing the 4 seasons. I printed some family pictures for each season, we talked about what we did and what season each picture belongs to. Material: Construction paper Crayons Scissors Glue Family pictures Directions: Glue the construction paper together writing one number of the year and one season on each paper. Decorate each season using the crayons and pictures. Enjoy and Happy New Year!

A Special Christmas Letter

Image
 We were very spoiled this Christmas. There was a pile of gifts under the tree and over flowing stockings. We are very fortunate to receive and give so many gifts. One surprising gift was an envelope  from my father. In it was a 2 page typewritten letter that he had written to my grandmother days before I was born. My parents didn't know if they were expecting a boy or a girl.  It was interesting to see what names they would have chosen if I had been a boy and what traits he hoped i would have. As I read the letter I could hear my father's voice, it hasn't changed in 33 years. Lots of parents write letters to their childen when they are born. I wrote one for my son. It was more informal written in a note book but the sentimment is the same. I thought of all the things I want for him and advice I wanted to give him but I never thought of when I would give it to him, until now. It was an amazing and thoughtful gift and espescially on Christmas. Now I ha

Mix n Match Christmas Game

Image
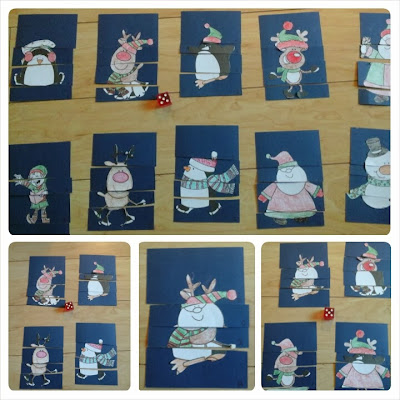
We recently found a great game at the library called Mix Max. It quickly became a family favorite. The game peices are rectangular cards of different sizes, each peice has a picture of a dice on the back numbered 1 to 4. The hats are number 1 the faces number 2 the bodies number 3 and feet number 4. The players roll the dice and take the card of the matching number, 5 is miss a turn and 6 is take one of each.  When all the cards are gone you flip the cards over and make funny miss matched characters.  This is a homemade Christmas version of that game. What you need: Christmas pictures  Card stock  Glue To make: Choose 10 Christmas themed pictures all of approximately the same size. You can print them or cut them out of a colouring book. Glue the characters onto the card stock. Cut each picture in four peices, hat, face, body and feet. On the back of each card draw a picture of a dice from 1 to 4. How to play: Turn all cards picture side down and make piles

Colourful Ornaments

Image
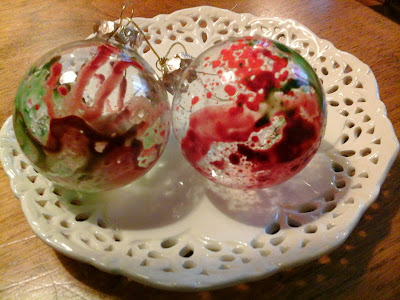
Easy colourful ornaments It's 3:30 on Sunday afternoon, guests are coming at 4:00 and my mom says let's make tree ornaments they're really easy. I'm not so sure about this, I can see a big mess and nothing being ready on time but she was right (she is after all the craft pro) it takes about 15 minutes and there is minimal mess, even with a 3 year old. It's a lot of fun and the ornaments turned out really well.  This is a definitely worth trying. Time: about 15 minutes (for 2 ornaments) Cost: Under: $5.00 (the ornaments are available at the Dollar Store) Materials: Plain glass ornaments Crayons Knife Hair dryer Making the ornaments Directions: Take the paper off the crayons.  Shave the crayons with a knife, making a pile for each colour. Remove the top of the ornament.  Place one colour of crayon shavings inside the ornament (do  one colour at a time or the colours will blend together.)  Blow dry the ornament, depending on the thickness of th

DIY Lego Advent Calendar

Image
Homemade Adevent Calendar Instead of chocolate advent calendars I like having an advent calendar of toys or activities that we can do as a family. It is nice to have a special time to slow down turn on the Christmas lights and play as a family. Last year we had a Playdough advent calendar, that was a big hit so the bar was set high for this year.  I was very excited when I came accross a Lego Advent Calendar because we are currently in a Lego obsession (the castle Lego with knights and treasure and even a dragon) but then I saw the price.  I decided to try and make one for half the price and this is what I came up with.  Tip: I bought one box of Lego (a small one) about 90 peices. I wasn't sure if I would have enough with one box so I bought a Playmobile knight set as well but there would have been enough with just one box. Time:1 hour Cost: $15.00 Material: 2 empty boxes (one rough cardboard and one soft cordboard) 1 box of lego (about 90 peices) Christmas wra

Snowman Magnet Name Tags

Image
Add a homemade touch to your presents Get your kids into the spirit of gift giving with these easy festive magnets. I found the snowman kit used above at Target but you can use any holiday shapes either bought in a pack or cut out your own out of foam sheets. Time: 15 minutes Cost: $10.00 or under Material: 1 package of foam Christmas crafts such as Snowmen ChristmasTrees, Gingerbread men etc. White glue Magnets Directions: Decorate the snowmen.  Add the names with foam letter stickers or with markers Glue a magnet to the back of each snowman Tape the snowman magnet onto the wrapped present

Cookie Gift Jars

Image
Making  homemade Christmas presents  is a fun way to involve the whole family in the gift giving process. My favorite is cookies in a jar. Everyone loves cookies and it is easy to adapt the recipe to fit the taste of the person you're giving it to. You can use this time to talk about the person who the present is for. I found these delicious Super Chunk Oatmeal Cookies here http://www.kraftcanada.com/en/recipes/super-chunk-oatmeal-cookie-mix-82913.aspx Tip: to make all the ingredients fit into the jars have your child press down on each layer using a mallet. Cranberry & Walnut Cookie Gift jar and Chocolate Chunk Cookie Gift jar Chocolate Chunk Cookies Ingredients:   In the jar: 1 cup flour 1 tsp cinnamon 1 cup sugar 1 cup quick-cooking oats 1/2 tsp baking soda 1/4 tsp salt 6 oz Baker's semi-sweet chocolate coarsley chopped   When making the cookies: 3/4 cup of butter or margarine 1 egg 1 tsp vanilla   To make cookie jars: Layer al

2 Cut and Paste Alphabet Activities

Image
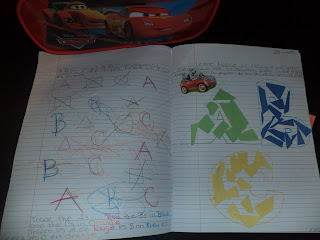
Every morning we take half an hour to sit down (actually sit still) and do some fun educational activities. These are some of my favorite alphabet activities they help develop fine motor skills as well as letter recognition. Letters in space Material: Peice of paper Scrap of construction paper Glue stick Colouring pencils Safety scissors Directions: Draw stars and a moon  and colour the background blue. Write the alphabet in lower case letters in the middle of the stars. On the construction paper write the alphabet in upper case letters.  Have your child cut out out the upper case letters and glue them on top of the lower case letter. Alphabet Soup Material: Peice of paper Scrap of construction paper Glue stick Colouring pencils Safety scissors Directions: raw a pot on top of a stove.  Write the alphabet on the construction paper and have your child cut out the letters and glue them in alphabetical order in the pot.

Fall Foliage Treasure Hunt

Image
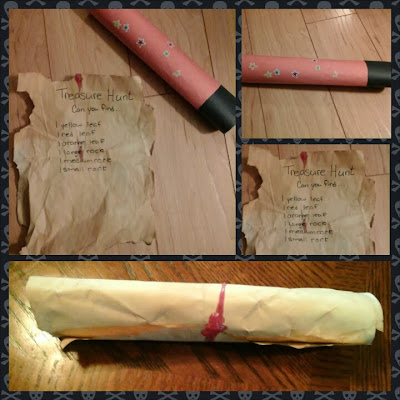
Make a fall themed treasure hunt for your little pirates. I made the map as a surprise and we made the spy glass together. We used an empty baby wipes container as a treasure box when we set off on our adventure.  Time: Map 15 minutes plus drying time Spy Glass 10 minutes Cost: Under $5.00 all household items and recycled material Map: Singe the edges of a peice of paper Soak the paper in cold tea dry on a flat surface Write the instructions for the treasure hunt.  I wrote: Treasure Hunt: can you find 1 yellow leaf 1 red leaf 1 orange leaf 1 large rock 1 medium rock 1 small rock Roll up the map and seal with wax or a ribbon. Spy Glass: 1 finished paper towel roll construction paper glue stick stickers Glue the construction paper around the paper towel roll and decorate with stickers.  Happy treasure hunting!

A Just Add Stickers kind of Afternoon

Image
Just Add Stickers.. to the wall and the windows and paper!   I surprised my son with not one or two but three kinds of stickers after his nap this afternoon. We had stickers for the wall stickers for the window and regular stickers for paper. I was glad that they didn't get mixed up!   It was a lot of fun and added to our Halloween decorations, except for the Sesame Street stickers those are just a staple at our house!   The end results   

Football Food

Image
Meat, cracker and cheese platter.   Fall is officially here meaning Football season has stated!  Football season means football food!  Chips are good but having a little one who eats everything we do makes me want to make sure we have some healthier football food options this season.  These have been big hits so far and every week they wait to see what football themed food I'll come up with. Directions: Meat, Cracker and Cheese platter: Ingredients: Small round crackers (I used Breton Garden Vegetables) Peperoni slices String Cheese On a platter arrange the crackers in the shape of a foot ball.  Arrange the pepperoni in the middle.  Separate the string cheese and arrange the cheese on top of the peperoni to look like laces.  Football Fruit: Ingredients: Grapes Apples Cheese (I added some white cheddar cheese with the fruit) With a sharp knife cut one long line down the grape and three small lines across it to look like laces on a f

Family Friendly Halloween

Image
Make it a family friendly Halloween day with decorations and themed food! Any occasion to decorate and make themed food and I'm all over it. This was a fun pre Halloween day we got out all our decorations and costumes from over the years and had fun preparing for Halloween.  Spooky Food: Mummy Dogs & Devil Eggs Food: For supper we had Mummy dogs and Devil Eggs, ideas I got from the October edition of Rachael Ray's Everyday Magazine. Devil Eggs Prepare deviled eggs to your taste. Cut small triangles out of red pepper strips and arrange as horns and beard. Mummy Dogs Cook hotdogs as directed. Warm a tortilla sprinkled with grated cheese. Cut the tortilla into strips and wrap around the hotdogs. Decorations: Besides the obliobligatory carved pumpkins we brought the outside decorations inside. Bigger decorations like tombstones fit wel in corners and can create an extra spooky atmosphere. Entertainment: The Halloween experience wouldn't be

My Festive Fridge: Halloween Magnets

Image
Halloween Magnets This is an easy and fun craft that everyone can help with and when you're done not only can the kids play with it but your kitchen will be decorated for Halloween.  For the supplies I raided the Halloween crafts section at Walmart which was still full because I got there early in the season.  I found a tub full of foam stickers, which were a big hit not only for this craft but to decorate everything. I bought some round magnets and the rest I had at home.  You can't go wrong!   Let the leaves fall off the tree by making each leaf its own magnet.   Time: 30 minutes Cost: Under $10.00 Material: Foam stickers Foam sheets in Halloween colours Fake leaves (I bought a ring used for center pieces at the dollar store) Glue, white glue and glue gun      Directions : Cut out Halloween inspired shapes: ghost, black cat, haunted house, tree etc. Choose which stickers you want to use but don't take the backing off.

Home Preschooling

Image
Our workbook - letter recognition I did a lot of research lately in preparation to home-preschool my son.   I made the choice when he was born to stay at home until he started school.   I was looking into preschools in my area and came to the realization that most are preschool daycares and since I decided to stay home and not use a daycare it didn’t make sense to send him to one.   I sat down and listed the reasons I wanted him to go to preschool.   After some research I realized that I could teach him at home.   He has weekly activities where he sees other children so I feel that the socialization aspect is taken care of.   I thought making the decision was the hard part then I had to come up with a curriculum.   Researching online was somewhat stressful it seems that there are dozens available but I wanted to tailor to my son’s needs and to what I thought was most important without having to spend lots of money on workbooks. This is what I came up with.   The skills I want

Emotions

Image
Emotions: surprised, happy, sleepy, sad, silly and angry I found that my son has picked up words for different emotions along the way but doesn’t always use them in the right way he’ll say sad for instance instead of mad.   So I came up with these puppets to help him learn the different emotions.   I wrote the emotion on the back and he had to find the mouth and eyes (eyebrows in some cases) that fit.   It was a fun activity and we spent time putting on little 'plays' with the puppets.   The plays mostly consisted of him standing behind his puppet theatre saying I feel something and then finding the right puppet but he learned the right emotion words without realizing it.   Time: 30 minutes Cost: Under $5.00 (you probably have everything around the house) Material: ·          Foam sheets (including black for the features) ·          Googly eyes ·          Popsicle sticks ·          Glue ·          Marker Directions: 1.        Cut 6 lar

What day is it?

Image
This is an easy and fun craft to help your child learn the days of the week.  It's very easy to personalize these door hangers, I made them bilingual by gluing stickers on each side.  Tip: I sorted out the letters we needed for this ahead of time but that would be a good activity for children who are learning to spell.   Cost: About $10.00          Time: 20 minutes Material: ·          Foam door hangers ·          Foam puzzle letters (any letters will do but I liked the way these looked and they are stickers so I was sold) ·          Foam stickers for decorating (you can use themed stickers if you have a specific activity that day) Directions: 1.        Sort the letters for the days of the week and stick them onto the foam door hangers. 2.        Taking the door hangers one at a time talk about what is special that day and then decorate            with stickers. 3.        Choose what day it is and hang it on your child’s door, change them ev

Family Tree

Image
I had wanted to make a family tree for my son’s nursery when I was pregnant but as many of my ideas that fell to the side.   The other day I was inspired by a clip on Disney Junior and I decided that this would be a perfect time to pick up the project that I had abandoned and let my son add his own touches.   It is a great project to make together and an opportunity to talk about the different relationships that make up a family. In this day of digital cameras we don’t have pictures lying around anymore waiting to be put into albums.   So you’ll have to  take a trip to a photo kiosk or print them at home if you have a good printer. Time : 1 hour Cost : Under $10.00 (other than the cost of printing the pictures I used what I had at home) Material : ·          Cardstock or construction paper (I used some scrapbooking leftovers for this project) ·          Family pictures ·          Glue ·          Scissors ·          Frame Directions : 1.        Cut ou

A Piñata for any Occasion

Image
I love making piñatas they are a great activity for kids at any occasion!  I make them out of cardboard boxes that are destined for the recycling fill them with candy, stickers and little toys from the dollar store cover them in papier-mâché and then paint them.   It takes several days to make it from start to finish with the drying times but it is worth it at the end to hear all the laughter and excitement. Time : 4 hours divided over 3 days, leaving time to dry over night between steps. Cost : About $10.00 for candy and toys Materials : ·          Large cardboard box (I use diaper boxes) ·          Small soft cardboard box (I use soft drink cartons) ·          Toys & candy ·          Newspaper ·          String ·          Flour & water ·          Paint ·          Tape Directions : Day 1 (2 hours) 1.        Decide what design or character you want the piñata to be and make a rough draft on a piece of paper.  C ut the shape of th