Posts

Showing posts from 2016

Looking Back

Image
We had some good times this year making lots of fun crafts and good memoriess! Wishing you all a very happy New Year!

Candy Cane Cookies

Image
This is one of my favorite Christmas cookies from when I was a kid. They are a little long to make but so delicious and fun to malke when you have little hands to help you roll out the dough. Ingredients: 1 cup butter 1 cup sugar 1 egg 1 1/2 tsp almond extract 1 tsp vanilla extract 2 1/2 cups flour 1 tsp salt red food coloring The dough: 1. Preheat oven to 375°F  line a baking sheet with parchment paper 2. Beat together butter, egg, sugar and flavors sift together flour and salt 3. Add the dry to the wet ingredients mix until well blended 4. Seperate the dough into two equal portions 5. Add the red food coloring to one of portions of dough. Making the cookies: 1. Roll two long thin ropes one of the red dough and one of the plain dough 2. Line the two ropes up side by side, cut the ropes into equal sized sections.    3. Twist each section then shape into candy canes. 4. Bake for 9 minutes until set and slightly browned

DIY Snowmen Jars

Image
These hot chocolate snowmen make great Christmas presents for your little ones to make for their teachers or grandparents. I have seen these made with baby food jars but since I didn't have any we made a bigger version with jars from the dollar store. What you need: Jars (it takes 3 jars per snowman, I used a smaller one for the head and equal sized ones for the body) Hot chocolate mix Mini marshmallows Peppermint candy Felt, red (for the scarves) orange (for the noses) Black sharpie Glue gun Super glue What you do: Decide how many snowmen you are going to make. Group all the jars together for each snowman. Cut out the number of noses and scarves you need. Glue the noses on the smallest jars. Draw eyes and a mouth with the black marker.  For each smowman draw buttons on one of the bigger jars. Fill the smallest jars with marshmallows. Fill the jars with buttoms with the peppermint candy. Fill the remaining jars with hot chocolate mi

Fall Scavenger Hunt

Image
It's not too late to spend a nice afternoon outside. This scavenger hunt is a great activity to keep the kids interested on a fall hike. What you need: Small paper bags Markers Pencils What to do: Make a list of 8-10 fall items that you know are fairly common in your area Example: a leaf of each cololr, a rock, stick, an acorn, a pinecone etc. Write 'Fall Scavenger Hunt' on the bag in gray or black marker. Use the same marker to make 8-10 boxes (one for each item on your list) Using the colored markers write the list of items on the bag  (one item next to each box) Place one pencil in each bag (to mark items off as you go) You're ready to hike!  As you check items off your list place the item in the bag. At the end of the hike take the items out to see what everyone collected. Enjoy!

Gingerbread Spooks

Image
 Why wait for Christmas for gingerbread cookies? Use your favorite gingerbread recipe to make these spooky skeleton and mummy cookies. We've made these before and each year they are a hit but the fun thing about baking traditions is that each year they seem to turn out better than the last and each year little man notices that he can help more that the year before. This year he made most of the recipe himself, rolled the dough flat, cut out the shapes and decorated half of the gingerbread men. What you need:   Gingerbread cookie dough (I used the Kraft recipe for  Gingerbread people )   White icing (either homemade icing in a piping bag or store bought decorating icing in a tube)   Chocolate chips (for the eyes)   Gingerbread man cookie cutter  What to do:   Prepare your dough and let chill in the fridge for 15 minutes.   Transfer the dough to the counter (line the counter top with wax paper makes clean up super easy!) Make sure to hav

Learning to Sew: Tooth Fairy Pillow

Image
My little man lost his first tooth! We were talking about the toothfairy and I remembered the tooth pillow I had when I was little, it was a purple heart with a white and purple pocket to place the tooth in. I made my tooth pillow with my mom using my little sewing machine. Sewing is something my mother is good at that I remember learning from her. I am not an avid seamstress (and I don't have a sewing machine) but I do like sewing by hand. So I thought it would be a good time to teach my little man some sewing basics.  What you need: You might have what you need on hand if not you can find it all at the Dollarstore.  Needle and thread  (the thread doesn't have to be an exact match to the color of the material, having a darker thread will help your little ones to better see their stitches.) 3 pieces of felt  (2 pieces of the same color for the larger shape and another color for the tooth pocket and accents) Batting  (you don't have to use re

3 Step Burlap Wreath

Image
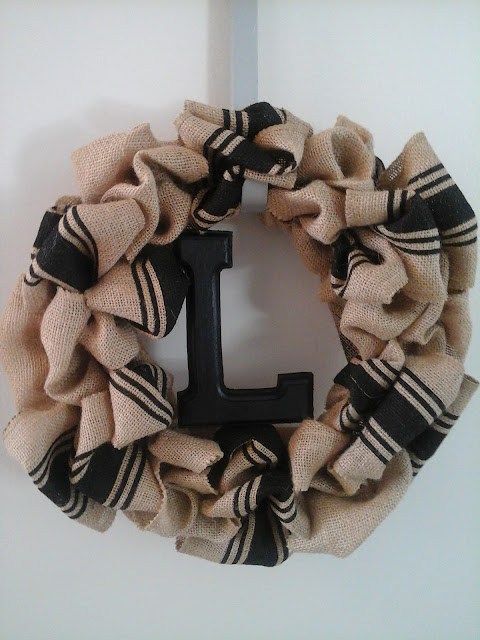
Of all the techniques to make burlap wreaths, this is my favorite. In 3 easy steps you can make a unique wreath for your front door. The fun thing about this wreath is the diversity of it, with a glue gun and some fabric leaves it can be a fall wreath, remove the leaves, add some lights and it's a Christmas wreath. The options are endless. What you need: 1 metal wreath frame 1 roll burlap ribbon 1 roll decorated burlap ribbon  (burlap printed with stripes, chevron or with lace accents) 1 wood letter (painted the color you want) 4 metal ties Glue gun Step 1: Pinch the end of the burlap together, using the metal ties attach the plain burlap to the smallest circle of the metal frame. The wreath frame is separated into 6 sections with 3 spaces in each, push the burlap through each of the three spaces, twist the burlap and do the same in the next section. Continue pushing the burlap through the spaces and twisting after each section. When you

Cooking Show

Image
   At the beginning of the summer when we were talking about all the activities we would do my little man said that he wanted to make a cooking show and that I should put it on TV. He came up with the idea that in each episode he would dress up as a character and make a snack having to do with that character. Since he has a closet full of costumes of characters ranging from Angry Birds to Darth Vader. He decides which recipe he wants to make with very little help from me. He is passionate about this and it makes me happy to support him in his creativity. Since the last week of summer vacation is coming up, I finally uploaded the first installment of Cooking With Characters onto YouTube. Hope you enjoy!   

Frozen Yogurt Sundae Bar

Image
Summer is in full swing and with it comes the time for ice cream treats. This is an idea for a healthier version of the traditional ice cream sundae in an edible bowl. Ingredients: Tortillas (one per serving) Cinnamon and Sugar Frozen Yogurt (any flavor) Fruit (fresh or frozen) cut into bite sized pieces Cookie pieces (crush up any cookies you have on hand) Cherries   To make the edible bowls:   Preheat the oven to 350 Arrange small oven proof dishes bottom side up on a cookie sheet Place the tortillas on the dishes wrapping the sides of the tortillas around the dish and pressing down to make an upsidedown bowl shape Sprinkle the tortilla bowls with cinnamon and sugar Bake for 15 minutes or until the tortillas are crispy Let cool      Prepare bowls of toppings, you can use any fruit you have on hand fresh or frozen, cookie pieces and cherries. Once the tortillas have cooled place them in a small bowl. Fill the tortilla bowls with frozen yogu

Outdoor Painting

Image
These monogram signs are the perfect outdoor painting project for little and big artists. Take a walk outside before painting to collect flowers, pinecones, sticks and rocks that would make interresting stamps for your artwork. Material: Canvas, wood canvas or wood sign (I used a wood canvas and a wood sign I found at the Dollar Store) Acrylic paint  Sponge brushes (or sponges) Masking tape Pine cones, flowers, sticks, grass etc. Marker (I used a silver sharpee) Step 1: Paint the canvas with a neutral back color and let dry Write a letter in masking tape (the first letter of your family name or your children's name) tape a border around the canvas. Step 2: Using sponge brushes or sponges paint the canvas. Sponge paint around the masking tape letter. Step 3: Using the pine cone, flower, stick and other nature made paintbrushes to stamp and make patterns on the canvas. Step 4: Let the canvases dry in the sun. Step 5:

Summer Fruit Cups

Image
This is a fresh, light dessert with just a little bit of chocolate and lots of summer fruit. It's a great  recipe to get the kids in the kitchen. Ingredients: Cherries (pitted and halved) Blueberries Cantaloupe (cut in chunks) Mini marshmallows Melted chocolate  (about 1/4c of chocolate chips melted in the microwave or in a double boiler) You will also need muffin papers Step 1: Fill the muffin papers with the fruit starting with the larger pieces. Any fruit combination works for this dessert. Step 2: Top the fruit with a couple of marshmallows and drizzle with the melted chocolate  Tip: prepare this dessert in a muffin tin and refrigerate until dessert time. Bon appétit!